


Introduction
Welcome DevOps enthusiasts and learners. In this blog we're taking a step forward into the world of containerization and Docker comes out out be the most popular amongst all of the tools. So we'll understand what containerization is, its usage and its benefits. We'll dive into Docker and understand the Installation Process and go through some of the most common commands. So without any more delay, let's just Jump into it.
Container and Containerization
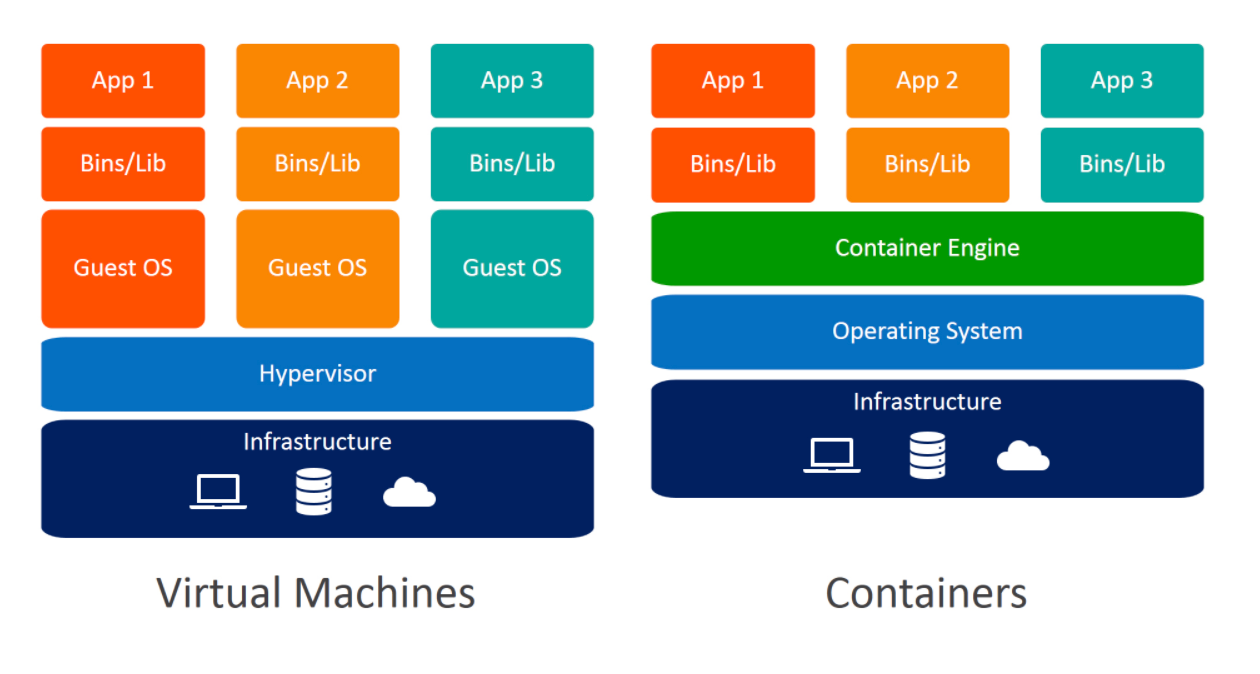
What is Container?
A container is an executable software package that contains the entire application, from code to runtime to essential packages and dependencies that are required for smooth functioning of the application.
It is lightweight and most importantly scalable which makes it the best option for scaling, distributing, transporting or running the application in any environment.
What is Containerization?
Containerization is a method of packaging an entire application and its dependencies into a container. This containerized application can then be run on any platform or Operating Systems.
These containers encapsulate everything the application needs to run, including libraries, binaries, and configuration files, ensuring consistency and reliability across different environments.
The most famous containerization tool is Docker and Kubernetes is used for container Orchestration.
Docker
Docker is a software that is used for containerizing application. It is an Open-Source application and is widely used for its user-friendly feature and extensive support. It provides developers and DevOps teams with an easy way to package, distribute, and manage applications within containers.
Docker simplifies the process of creating and managing containers by providing a set of tools and APIs that abstract away much of the complexity involved in containerization.
Some of Docker's most useful features include versioning, layering, and networking, which further enhance its capabilities for containerization.
Read More about Docker, Here.
How Docker Works? A short and Quick Overview
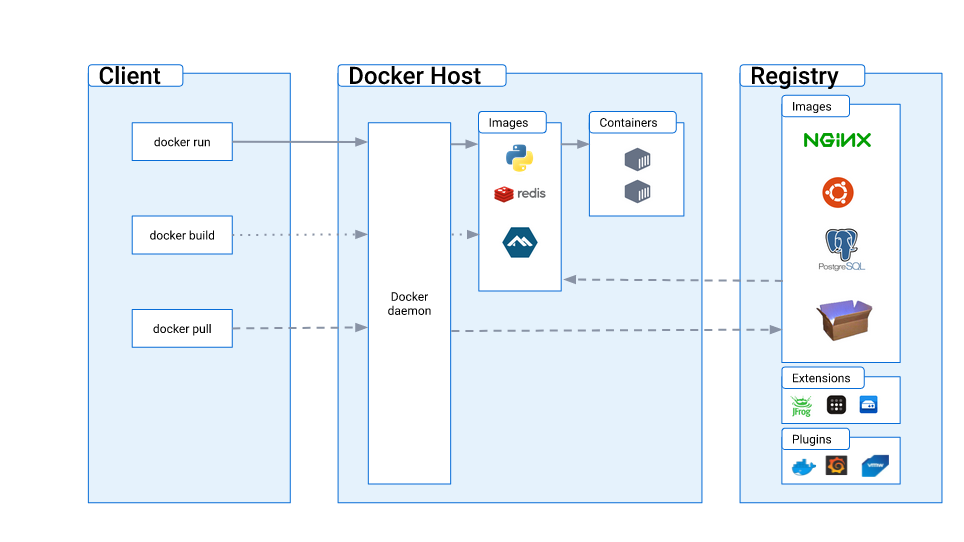
Docker works by leveraging operating system-level virtualization features, primarily using containerization technology provided by the Linux kernel. Here's a simplified overview of how Docker works in the background:
Docker Container: Think of a Docker container as a small self-contained box that holds everything you need to run an application—code, libraries, and settings.
Docker Image: Before you can create a container you need a blueprint called an image. It’s like having a template for your character.
Docker Daemon: This is similar to Docker’s manager. It runs in the background all the time, making sure everything works properly in Docker.
Docker Client: Think of this as a way to talk to your Docker Daemon. You give it commands like "create this image" or "move this object".
Building and Running: You use Docker to build an image from a blueprint (Dockerfile) and then run it to build the container.
Isolation: Each character is like their own little world. They cannot be seen or tampered with from one another, making it safer to run multiple applications on the same machine.
Networking: Docker helps containers talk to each other or the outside world, so they can work together or connect to the Internet.
Storage: Docker can store data in containers that need to be associated with it, such as databases or user uploads, in a way that is easy to manage and back up.
Commands
Here are some of the most important Docker Commands:
To run a Docker Container:
docker run <image_name>To run a Docker Container in detached mode (in the background):
docker run -d <image_name>To run a Docker Container with a specific name:
docker run --name <container_name> <image_name>To run a Docker Container and expose ports:
docker run -p <host_port>:<container_port> <image_name>To run a Docker Container with environment variables:
docker run -e <key>=<value> <image_name>To run a Docker Container with volumes:
docker run -v <host_path>:<container_path> <image_name>To run a Docker Container with interactive mode (to enter the container's shell):
docker run -it <image_name>-it: Interactive Terminal
To run a Docker Container with resource constraints:
docker run --cpu-shares=<value> --memory=<value> <image_name>List images in Docker
docker imagesTo see the running containers
docker psTo see all the containers, running or stopped
docker ps -a
Remember to replace <image_name> with the name of the Docker image you want to run, and adjust any additional options as needed for your specific use case.
Read In detail, Here.
Hands-on Practice
Tasks
Use the
docker runcommand to start a new container and interact with it through the command line. [Hint: docker run hello-world]Use the
docker inspectcommand to view detailed information about a container or image.Use the
docker portcommand to list the port mappings for a container.Use the
docker statscommand to view resource usage statistics for one or more containers.Use the
docker topcommand to view the processes running inside a container.Use the
docker savecommand to save an image to a tar archive.Use the
docker loadcommand to load an image from a tar archive.
These tasks involve simple operations that can be used to manage images and containers.
Solution:
Run Docker command and Interact with it
docker run hello-world
Docker Inspect
docker inspect <image_name>
Docker Port Mapping
We map the ports to port 80

Docker Stats to check the stats of the running container
docker stats container_name1 container_name2

This Will appear and show stats of all the "Running" Containers.
View the processes running inside a container:
docker top <container_id>Save an image to a tar archive:
docker save -o <output_file.tar> <image_name>Load an image from a tar archive:
docker load -i <input_file.tar>
Conclusion
And that wraps up today's blog! We covered a range of Docker commands, from the basics to more advanced ones, and even got our hands dirty with some practical exercises. Throughout, we gained a solid understanding of containers and containerization, while also peering into the inner workings of Docker.
Join me again tomorrow as we delve even deeper into Docker, exploring its commands and functionalities in greater detail. I trust that today's insights have enriched your learning journey. Until next time, stay curious and keep exploring!
Ending this with a quote
Believe you can and you're halfway there. - Theodore Roosevelt
Happy Learning.